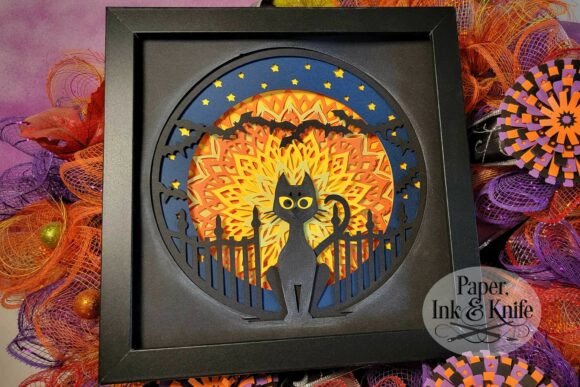
Creating Stunning 3D Shadowbox Art with Cat and Mandala Moon SVG Templates
Introduction to 3D Paper Shadowboxes
Welcome to the world of 3D paper shadowboxes, where creativity and craftsmanship come together to create stunning, layered artworks. This article will guide you through the process of using the Cat and Mandala Moon Shadowbox 3D SVG and Black Cat and the Moon 3D SVG templates, which are perfect for both beginners and experienced crafters. These templates offer a unique way to bring your artistic vision to life with 8 layers of intricate papery goodness.
What is a 3D Paper Shadowbox?
A 3D paper shadowbox is a decorative art piece that uses multiple layers of cut and assembled paper to create a three-dimensional effect. Each layer adds depth and dimension, making the final product visually striking and full of character. These shadowboxes can be framed or displayed unframed, adding a touch of elegance and creativity to any space.
Overview of the Template
The Cat and Mandala Moon Shadowbox 3D SVG template is designed to fit an 8 x 8 inch shadowbox frame, but it can be resized easily to suit your needs. The template includes 8 layers, each meticulously crafted to create a beautiful, detailed scene. When assembled, the shadowbox will have a depth of approximately 1/2 to 1 inch, depending on the thickness of the foam tape used between the layers.
Template Contents
- 1 PDF Instruction File: Detailed step-by-step instructions to guide you through the assembly process.
- 2 SVG Files for Cricut Users: One with layers stacked together and one with layers unstacked in a single file.
- 1 DXF File for Silhouette Machines: Compatible with Silhouette cutting machines.
- 1 EPS File: A versatile file format for various software and machines.
- PDF for Hand Cutting: Black outlines on white, sized for 8.5 x 11 paper to make an 8 x 8 shadowbox.
- PNG for Printing: Full color, 8 x 8 inches, for printing and resizing.
Materials Needed
To assemble your 3D shadowbox, you will need the following materials:
- 65 lb cardstock (for durability and clean cuts)
- Double-sided foam tape (to create the 3D effect)
- Shadowbox frame (optional, but recommended for a polished look)
- Cutting machine (Cricut, Silhouette, etc.) or scissors and a cutting mat for hand cutting
Step-by-Step Guide
- Download and Unzip the Files: Start by downloading the template and unzipping the files. Extract the file format that you need based on your cutting machine or preferred method.
- Print or Cut the Layers: If you are using a cutting machine, load the appropriate SVG, DXF, or EPS file into your software. For hand cutting, print the PDF file and carefully cut along the black outlines.
- Prepare the Cardstock: Use 65 lb cardstock for the best results. This weight provides the necessary sturdiness without being too thick to cut cleanly.
- Assemble the Layers: Begin by laying out all the cut layers in the order they will be assembled. Apply double-sided foam tape to the back of each layer, starting from the bottom and working your way up. This creates the 3D effect and gives the shadowbox its depth.
- Add the Final Touches: Once all the layers are assembled, you can add the final touches. If you choose to frame your shadowbox, place it in the 8 x 8 inch frame. If you prefer to display it unframed, ensure all the layers are securely attached and the edges are clean.
Tips and Tricks
Here are some tips to help you achieve the best results with your 3D shadowbox:
- Use High-Quality Cardstock: The quality of the cardstock can make a big difference in the final appearance. Choose a 65 lb cardstock for a clean, professional look.
- Test Your Cuts: Before cutting all the layers, do a test cut to ensure your settings are correct. This prevents wasted material and frustration.
- Apply Foam Tape Carefully: Double-sided foam tape can be tricky to apply. Take your time and make sure the tape is evenly distributed to avoid air bubbles or uneven layers.
- Consider Adding Lights: While the template does not include lights, you can add LED strips or fairy lights to enhance the visual impact of your shadowbox. This is especially effective for night scenes like the Cat and Mandala Moon design.
Conclusion
Creating a 3D paper shadowbox with the Cat and Mandala Moon Shadowbox 3D SVG and Black Cat and the Moon 3D SVG templates is a rewarding and creative project. Whether you are a beginner or an experienced crafter, these templates provide a fantastic opportunity to explore the world of 3D paper art. With the right materials and a bit of patience, you can create a stunning, layered masterpiece that will be a conversation starter in any room. Happy crafting!